Submit a Repair Request
IMPORTANT: Check the list of common issues and solutions below before submitting your request:
Rotating the Lock for Key Access
Garbage Disposal Best Practices
How to Unclog a Toilet
Resetting GFCI
Resetting the Garbage Disposal
Resetting a Breaker
If none of the above items resolve your issue, follow the steps below.
Log in Now
Make a repair request by logging in to the portal now. We'll respond to your submission as quickly as possible.
New Client?
If you're a new customer and need help accessing your account, please give us a call: (616) 329-6318
Maintenance Issue FAQ
 Dryer isn't heating up? Check this article: Dryer Not Heating? 5 DIY Troubleshooting Tips for Dryer Problems
If your dryer is heating up but not drying, you may have a vent issue. Please look at this article: What Causes the Clothes Dryer to Shut Off After a Few Seconds?
 Check out the Repair Clinic website for advice:
Refrigerator Repair Help
All properties have smoke detectors.
Smoke detectors have 2 alarms that mean different things:
- Beep/chirp approximately 2-3 times every 5 minutes most of the time means the battery needs changed. If that doesn't fix it, it may have lost power to the unit or have a loose connection. If you unplug the detector from the ceiling/wall, it will probably continue making noise because there is a back-up battery in most of them. If you take the battery out it still has enough power stored internally to beep 4-5 more times. Tenants are responsible for changing smoke detector batteries
- Beeping/chirping non-stop means there is smoke/fire or it's a false alarm.
See below for false alarms:
- Most false alarms (chirping non-stop) are caused by dust in the sensor area of the detector. - Fixed by blowing out with compressed air or vacuum.
- Some smoke detectors have an expiration (10yrs for example & usually labeled on back of unit) and after that time period they start having false alarms. - Fixed by replacing expired detectors.
- Very rarely, false alarms are caused by drastic temp./weather changes, such as attic being 120 degrees and house at 75. - Fixed by pushing the silence button (if it has one) and after a short time it will reset and hopefully not falsely go off again.
- Very rarely, false alarms are caused by air blowing directly on the detector (open window, ceiling fan blowing upward instead of downward, etc.). - Fixed by re-directing air movement away from detector.
- Very rarely, false alarms are caused by a defective detector. - Fixed by replacing detector.
If you have a fire, call 911, get out of the house and to a safe location, then call our office.
If your smoke detector is not working correctly, put in a work order and we will replace it.
On average, ten people die every day in the US as a result of house fires. Though that number is high, the widespread use of home smoke detectors has resulted in a significant decrease in the number of house fire related deaths and injuries
- Push the test button on the alarm to check the sound. If you don't hear anything, replace the batteries or check the detector's wiring for damage.
- To test the sensor, use an aerosol spray designed specifically for testing smoke detectors. If the detector doesn't go off, you may need to replace it.
- You can also check the detector with real smoke. Light 2-3 matches, hold them a few feet underneath the detector, and wait for the alarm to sound.
Performing a Safety Test
Warn family members.
Unless you are trying to conduct a fire drill, you should let everyone in the home know that you will be testing the smoke detector so that they will not feel frightened when the detector goes off.
- If your smoke detector is hardwired to a monitored security system, be sure to notify the security system's company that you are performing a test before you test the alarm. You don't want the fire department showing up at your door!
Ask someone to help you.
When testing an alarm, it will sound loud to you because you are going to be standing directly underneath it. However, you may also want to be sure that your detector is loud enough that anyone in any room in the home can hear it. Remember, it has to be loud enough to awaken the deepest sleeper in the household.
- Ask them to stand in the room farthest away from the detector when you are testing it. They may also try standing outside the house to see if it is possible to hear it from outside.
Test the power.
Many smoke detectors are equipped with a light that indicates the unit is receiving power. However, you should still use the test button to ensure that the alarm will sound properly. You can do this by pushing and holding the test button for a few seconds.
- When you push the test button, the alarm should sound. If it doesn’t, you know that your detector is not receiving power. You may need to replace the batteries, or call an electrician to check the wiring if your detector is hardwired.
- You can stand on a chair or ladder to reach the alarm with your hand, or you can use a broom handle to push the button.
- Some detectors will turn off on their own after a few seconds, while others may be turned off by pushing the test button again.
- Some smoke alarms go into a "programming mode" if you hold the button for more than a second or two. If that happens, just wait a minute for it to return to normal and then press the test button BRIEFLY.
Check the smoke sensor using an aerosol spray.
In addition to making sure that the unit is receiving power properly, you will want to make sure that the detector’s smoke sensor is working correctly, too. You can purchase an inexpensive aerosol spray, which is designed specifically for testing smoke detectors. If your alarm does not sound when you use this product as directed by the manufacturer, the sensor in your detector may be worn out. If this is the case, replace your detector immediately.
- Follow the directions as stated on the can.
- You can usually purchase these for a few dollars in a hardware or home improvement store.
- To turn off the alarm after testing, you can use a small hand-held vacuum to suck the test material away from the detector. Some detectors may also have a "silence" button that you can push to stop the alarm. Avoid waiting for the detector turn off on its own, as this may drain the battery.
Test the smoke sensor using real smoke, if allowed by the manufacturer's instructions.
You can also use real smoke to test the smoke sensor. To do this, light two or three matches, and hold them together a few feet underneath the detector. The smoke from the matches should cause the alarm to sound if the detector is functioning properly. If it doesn’t sound, replace the detector immediately.
- Be sure to keep the matches a few feet away from the detector, otherwise you risk melting or damaging it.
- As with the aerosol, you can use a vacuum to suck the smoke away from the detector, or push the silence button if your detector has one.
- Use of actual smoke may temporarily reduce the effectiveness of the sensors and is generally not recommended by professionals.
Test your detector at least once each month.
Some recommend testing your detectors each week. Obviously it is better to check them more frequently, so do it each week if you can. If you can’t, then be sure to plan a time each month to check each smoke detector.
- Checking your alarm often means you are likely to catch a malfunctioning detector quickly; thus, you are more likely to have a properly functioning detector when you need it.
- Setting aside 30 minutes to an hour once each month to check each detector all at once will be more efficient than checking each alarm at different intervals.
Source: Wiki How
**If you smell gas in your house, follow these instructions:**
- Check to make sure you didn't leave the stove on or that a knob on the stove is partially turned on.
- If it is the stove and you cannot get it to stop, pull the stove out and turn it off at the gas shut off.
Natural gas is a popular fuel for home and water heating. Unfortunately, if you have natural gas appliances, there’s always a small risk of a gas leak—which could cause a fire or explosion if the leaked gas comes in contact with a spark. Breathing air with high concentrations of natural gas can also cause asphyxia and possibly death.
That’s why you need to take potential gas leaks very seriously. Learn what signs to watch out for and what to do if you discover your home has a gas leak.
## **Signs of a Natural Gas Leak**
### **Rotten Egg Smell**
While natural gas is odorless, colorless and tasteless, utility companies add a sulfur-like odor to the gas that enters your home so you have an effective way to detect a leak. If you smell rotten eggs with no apparent source, it could mean you have a gas leak.
### **Other Signs of Natural Gas Leak**
You shouldn’t rely solely on your nose to detect a leak. You may have a diminished sense of smell, other odors could mask the rotten egg scent, or smelling the same odor for too long could desensitize you to it. Loss of odorant in the natural gas itself could also make it more difficult to sniff out.
That’s why you should watch for other signs of a natural gas leak:
- Hissing, roaring or whistling coming from a natural gas appliance
- Damaged fuel lines leading to a gas appliance
- Dead vegetation above the natural gas pipeline leading into your house
- Unusual water bubbling or soil movement on your property
- A natural gas pipeline is exposed after an earthquake, flood, fire or other disaster
## **What to Do If You Think Natural Gas is Leaking**
If you smell rotten eggs or suspect a gas leak for another reason, follow these steps:
- Don’t do anything that could cause a spark. This includes flipping a light switch, unplugging electrical devices or using a phone (landline or cell).
- Put out anything currently burning. This includes snuffing out cigarettes and blowing out candles. Don’t light a match, stove, or cigarette lighter if you suspect a gas leak.
- Open windows and doors to let fresh air inside.
- Turn off the gas supply at the meter and keep it off until deemed safe to turn back on.
- Standing a safe distance away from your home, call your gas provider.
This article was information from: Ugienergylink.com
If your garage door isn't closing all the way, you may have a problem with the aligning of the sensors at the bottom corners of the garage door. This may occur if anyone has accidentally bumped into them. For a video of how to properly align your garage door, watch the video below:
- Check to make sure you have an AC unit. Some properties do not come with air conditioning but still have an air conditioning switch on the thermostat.
- Check that a fuse hasn't blown or that the circuit breaker hasn't tripped. Replace with the appropriate fuse or reset the circuit breaker.
- Check the furnace filter. If the filter is dirty it needs to be replaced.
- Check the thermostat. Make sure the batteries are good and that temperature isn't set too low if the inside temp is high inside.
- Check the outside unit to make sure the fan blades are moving and that the unit is not iced over.
- Some AC units have a light switch right next to the furnace which turns the furnace and AC off. Because this switch is identical to a light switch, it gets turned off by mistake. Simply check any nearby switches. If they don't turn lights on and off, they may be turning the furnace and or AC on or off.
If your furnace isn't working, please check these items:
- Check to make sure your gas is still on in the house. Light a stove burner or call your gas company.
- Check the breakers in the home to make sure a breaker hasn't tripped.
- Here is a helpful video you can view to check the breakers
How do you change a furnace filter?
Changing the filter is a fairly easy task. Again, consult your manual for proper procedure, but typically the process for how to change a furnace filter goes as follows:
- Turn off the furnace.
- Locate the service panel and remove it.
- Slide out the existing filter (located near the intake/outtake blower fan).
- Slide in a new filter.
- Turn the furnace back on.
Plumbing Leaks
If you have a plumbing leak, put a work order in with our office and do the following steps.
- If it is a drain leak that you can get to (I.E.- kitchen sink drain or bathroom sink drain), try to put something under it to catch the water. Soak up the water where it was leaking.
- If it is a drain that you cannot easily get to (I.E.- Tub drain) try to soak up any water that you can get to and quit using the fixture until we can fix the leak.
- If it is a water supply line leak, try to shut off the water as soon as you can. See the related article about shutting the water off to your unit.
Before putting in a work request, please follow this external link for unclogging a drain.
Please remember that drains clogged by hair, grease, food, feminine products, wipes, other anything else that isn't meant to go down the drain will be charged back to the tenant.
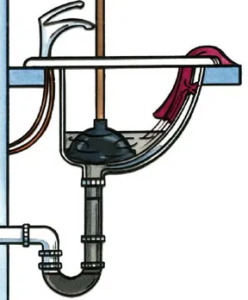
TO UNCLOG A SINK DRAIN, COVER THE PLUNGER'S RUBBER CUP WITH WATER AND PLUG THE FIXTURE'S VENT OPENING WITH WET RAGS.
Dealing with a clogged drain is just no fun. Fortunately, there are steps you can take before calling a plumber to try to clear that clog.
**Step 1:** Cover overflow opening in basin or tub with wet cloth. Most kitchen sinks don't have an overflow vent, but if you're working on one of two side-by-side basins, plug the other basin's drain opening with wet cloths. In homes that have two bathrooms back to back in adjacent rooms, both may be connected to the same drain. In such cases you must block the other basin at both its drain and overflow vent. Shower facilities seldom have overflow vents; bathtubs do. Cover all of them with wet cloths for plunger to work properly.
**Step 2:** Fill clogged basin with enough water to cover head of plunger. Coat lip of plunger with petroleum jelly (this helps create better seal). Slide plunger's cup over drain opening, then rapidly pump plunger up and down. You should feel water move in and out of drain. It is this back-and-forth water pressure that can eventually build up enough force to dislodge whatever is blocking drain. After about a dozen firm strikes, jerk plunger up quickly. Water should rush out. If it doesn't, try same procedure two or three more times before attempting another method.
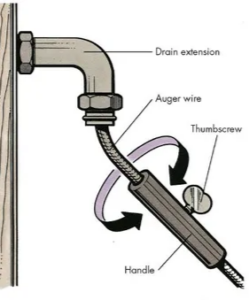
If the clog is not in the fixture's trap, insert a drain-and-trap auger into the drain extension that goes into the wall, and work the auger into the drainpipe.
**Step 3:** If plunger doesn't remove clog, consider using chemical drain opener. For drain that's completely blocked, however, it's best not to use chemicals, as they contain caustic agents that can actually harm some fixtures. Instead, use drain-and-trap auger. To use it, remove popup stopper or strainer from clogged drain and insert auger wire into opening. As you feed flexible wire in, crank handle of device, loosening and then tightening thumbscrew on handle as you advance wire. If wire encounters something, move it back and forth while you turn auger handle. Then continue to turn handle while slowly withdrawing auger.
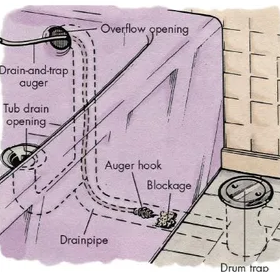
A clog near the tub's drain can be attacked from several places -- the overflow opening (as shown), the tub drain opening, or the drum trap. Start working at the tub drain. If you can't remove the obstruction there, move onto the overflow and then the drum trap.
**Step 4:** If auger doesn't clear drain, remove clean-out plug from under sink, catching water from trap in bucket. You can use wire coat hanger with hook shape in one end to try to reach clog. If this fails, insert wire of drain-and-trap auger through clean out. Work wire toward basin and drainpipe to remove blockage.
**Step 5:** If trap does not have clean out, remove trap. (The section [How to Replace a Drain Trap](https://home.howstuffworks.com/home-improvement/plumbing/how-to-unclog-a-drain3.htm) provides complete instructions on how to remove and replace a drain trap.) With trap removed, clean it out with wire coat hanger and then with stiff brush and hot soapy water; replace trap. If clog wasn't in trap, insert drain-and-trap auger into drain extension that goes into wall and continue working auger down into drainpipe itself. You should be able to reach blockage, unless it's in section of main drain.
**Step 6:** If bathtub drain is clogged and plunger doesn't clear it, use drain-and-trap auger first through tub drain opening. If this doesn't work, remove overflow plate and insert auger directly into overflow pipe and down into drainpipe.
Unclogging floor drains and main drainpipes is another job altogether. Find suggestions for tackling these plumbing issues in the next section.
No, flushable wipes are not flushable. Nothing should go down the drain except toilet paper (don't overload it- a couple flushes is OK!) and bodily fluids.
Shutting Off Water to Whole Home
Identify the main shut off valve.
This is usually a brass valve that has a round handle. In most homes, it is located near the main water pipe leading into your home. Common locations for this pipe include the kitchen, downstairs (basement), or a utility room.
- In warmer regions, you may even find this valve outside. However, in colder climates, expect to find it inside the home.
- Always shut off the valve that's closest to the inside plumbing, as opposed to the valve that's closer to the street.
Shut the valve by turning it clockwise.
This will cut off the stream of water flowing into your home. If the valve is stiff, wear a glove while closing it to protect your hand as you apply some elbow grease. After that, all appliances that use water will no longer work until the water is turned back on.
- Fixtures or appliances with a reservoir may still have limited usage after cutting off the water. Toilets, for example, usually flush one more time even while the supply is cut.
Turn on all of the faucets to flush the remaining water in the system.
Run your sinks, baths, and showers until the water stops flowing. When water's been bled from the lines completely, turn all of the faucets off. Now you can begin your plumbing repairs safely.
- When you are finished with your work, turn the valve counterclockwise to restore the water supply to your home.
Run all water lines and water-using appliances. After restoring water to your home, run faucets for a short while to bleed air from the pipes. You'll also want to run appliances that use water, like your dishwasher and washing machine.
Shutting Off Water To A Fixture
Locate the cutoff valve closest to the fixture.
Most fixtures will have an individual shut-off located beneath the fixture.
It will likely be a chrome valve. Sinks and showers may have two valves, one for hot and one for cold.
- Some appliances, such as washing machines, dish washers, and refrigerators, may have a water shut off switch on the body of the appliance or on the hose connecting the appliance to the wall.
- To find the shut off for a water heater, look for a water cutoff valve directly above the heater on a connected pipe.
Turn the valve clockwise.
This will cut off the water to the fixture. If there are separate valves for hot and cold, you'll need to turn both off. Afterwards, you'll still be able to use running water in other fixtures or appliances throughout the rest of the home.
- Old or dirty valves may be difficult to turn at first.
- If the valve is stubborn and won't turn easily, wear a work glove to protect your hand so you can turn with more force. Severe cases might require a wrench.
Make any necessary repairs.
With the valve closed, the water should be shut off. You'll need to drain water remaining in the line between the valve and fixture, so keep a bucket handy. When you are finished, turn the valve counter-clockwise restore the water supply.
- Gravity will cause excess water to drain. Position your bucket beneath the line or
Refer to article How to Turn Off Your Water Supply Quick and Easy
If your dishwasher is not working, follow these steps:
The dishwasher doesn't work, no lights or sound
- Check to make sure you didn't blow a breaker
- Check to make sure the door is latched tightly
The dishwasher doesn't start, but motor hums
- Put in a work order with us
The dishwasher doesn't fill with water
- Check to make sure the water is turned on to the dishwasher. The valve is typically located under the sink.
- Check to make sure the door is latched
The Dishwasher doesn't drain
- Check the screen/drain to make sure it is clear. Make sure you let the water cool off before you do this.
- If you have a garbage disposal, make sure it is clear.
- Re-run one cycle and see if the problem persists
The dishwasher has soap coming from the door or it leaks water
- Make sure the door is shut and latched
- If you have a garbage disposal, make sure it is clear and working.
- Make sure you are using the correct detergent. Do not use dish soap!
Dishwasher not cleaning properly/Dishes aren't clean
- Make sure your plates are washed off before putting them in the dishwasher
- Make sure the water is hot at the sink before starting the dishwasher
- Use a dishwasher cleaning agent. We suggest using a product called "affresh" monthly.
- Run one to two cycles with no detergent to clear any residue.
The door does not close or latch
- Check for obstructions
The dishwasher does not complete cycle
- Let the dishwasher finish, then run one more cycle and it should clear itself.
The detergent cup doesn't open
- Check for obstructions and clean the cup.
Follow this external link/article.
This is easy to fix, if you know what to do; and we do. First scoop out as much water as you can and dump it in the sink. Next add a cup or two of white vinegar and run the dishwasher for a short time. Now scoop out more water.
The vinegar cuts the foaming action of the soap. You may have to repeat the process to eliminate the suds because some soapy water remains inside the pump and hoses.
Also, if you poured it into the soap dispenser, wash that out by hand to get all the dish soap out.
If you lost power in one of these areas, please refer to our help article on resetting breakers/GFCIs which can be found in the next FAQ
A circuit breaker provides protection by stopping the flow of electricity if an overload or fault occurs. When an electrical fault occurs or the load on your circuit becomes too great, the breaker on that circuit trips and interrupts the flow of current to that circuit. A tripped circuit breaker is still sometimes referred to as a "blown fuse" in reference to the older technology that circuit breakers replaced.
Check out video: How To Reset A Tripped Circuit Breaker
Before electricity can be restored, the circuit breaker must be reset. However, even before you do that, you must take steps to ensure that it is safe to do so. Turn off or unplug all of the devices that are plugged into the circuit. Make certain no dangerous condition exists before restoring power. A Circuit Breaker that has been tripped will either be in the middle or "OFF" position. Locate the tripped circuit breaker and reset it by pushing it all the way to the "OFF" position and then back to the "ON" position. Often when you can't cannot reset the circuit breaker, it is because it must be turned all the way to the "Off" position first.
Electricity should now be restored to the circuit. If the circuit breaker trips again before you have turned anything on or plugged anything in, please submit a maintenance request to Simple Home Management.
If there is no power in the kitchen/bathroom/outside or around one of those areas, check to make sure there is not a GFCI that is tripped.
How to Reset a GFCI Outlet
NOTE: If you have lost power in roughly half of your unit and you've checked all the above items, then there is a chance you lost a "leg of power". In this case, it's best to call the power company before putting in a work order.
If you don't have hot water please follow these steps:
- Make sure gas is on to the home. Light a stove burner (if it is a gas stove) or call your gas company.
- Check to make sure a breaker hasn't tripped.
- Check to make sure the water heater hasn't been turned down or off on accident.
- Check the water heater- if it is leaking, call Simple Home Property Management right away.
- Run hot water in the kitchen for a couple minutes to make sure that the water is not taking a while to get to your unit.
- Check other water appliances to make sure they don't have hot water.
- If other water appliances have hot water, check to make sure the hot water is turned on to the appliance that does not have hot water. The valve to turn the water on and off is usually underneath the sink that doesn't have hot water.
If these do not work, put in a work order with our office.
How To Use a Garbage Disposal
KEY TIP: Never put fats, oils, or grease into a garbage disposal. Learn what not to put into a garbage disposal.
- Run a steady stream of cool water into the sink before turning on the garbage disposal. Learn why cool water in the disposal is best.
- Before placing any food waste into the disposal, turn it on first.
- Gradually feed food waste into the disposal, avoid putting large amounts of food waste all at once as this may slow the grinding process.
- Once the food waste has been broken down, turn the disposal off and let water run for a few seconds to flush the drain pipe.
Note: It usually takes only a few seconds to grind food waste, although it depends on the quantity and type of food waste. The sound of the disposal will change when there is no more food waste in the grind chamber.
We know that unintended problems do arise in the kitchen, so if your disposal stops working, check out how to reset your disposal before calling our Support team.
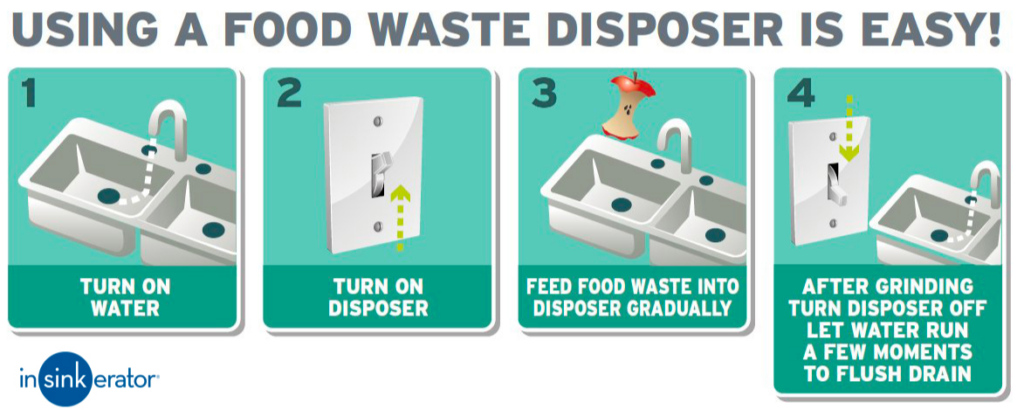
Information for this article found on: http://blog.insinkerator.com/how-to-use-garbage-disposal/
Below are common problems with garbage disposals on how to solve them. If none of these work, please put in a work order.
How to Reset Garbage Disposal
If your garbage disposal won't run you may need to reset the garbage disposal using the RED overload protector button on the bottom. If the disposal is clogged, if it is run for a very long period of time, if it overheats, or if there is something wrong with the disposal, it will shut down automatically and need to be reset.
If the overload protector has tripped, you will see that the red button has popped out about a quarter of an inch (5mm).
To reset garbage disposal follow these simple instructions:
- Make sure that the disposal switch is in the "OFF" position.
- Gently press the red button in to reset garbage disposal. If it does not stay in (retracted), wait ten minutes and try again.
- Turn on a cold stream of water and turn the disposal switch to “ON” position, the disposal should now run again.
- If the garbage disposal reset button still will not stay in, or if you have to repeatedly reset the overload protector, the disposal may require service.
How To Fix a Garbage Disposal That Is Humming
One of the most common garbage disposal issues encountered is when the switch is flipped and the disposal simply begins making a humming sound. The good news is that generally speaking this is an easy fix. In fact, in most cases it only takes a matter of seconds to rectify the issue.
The best part about this common issue is that in most instances anyone can fix the problem regardless of their skill-set. Additionally, you won’t necessarily have to purchase any tools in order to get your disposal back in working mode. Most disposals come with an Allen wrench attached to them which should be the only tool you may need to fix a humming garbage disposal.
Garbage Disposal Stuck with Waste
Before we tackle how to fix garbage disposal humming we must familiarize ourselves with the various reasons that could be causing the garbage disposal stuck. Knowing the cause will allow you to quickly determine how to fix your disposal.
Keep in mind that when the disposal is humming this means that it is getting power, but is not functioning properly. This is generally due to a jam.
In most cases if your garbage disposal is humming it is because a foreign object is stuck in the disposal. If an item has been jammed in the blades of the disposal they will be unable to rotate. This can result in a humming noise. If this is the case simply unplug the disposal under the sink then survey the drain hole. If you discover that an object is stuck in the blades remove it. Once you have done this you can plug the disposal back in and flip the switch. This should clear up the problem.
If there is no item stuck in the blades of the disposal obtain the Allen wrench that should be attached to your disposal or that came with it. There is a breaker socket located on the bottom of most disposal brands. Place the Allen wrench in the breaker socket and turn it back and forth. By doing this you may be able to unlock the source of the problem. Just be certain that the disposal is not turned on when doing this.
Sometimes you will also need to reset the disposal.
If your garbage disposal is clogged, refer to this external link.
Information for this article found on: http://blog.insinkerator.com/how-to-reset-garbage-disposal/ and https://www.mrgarbagedisposal.com/fix-garbage-disposal-humming/
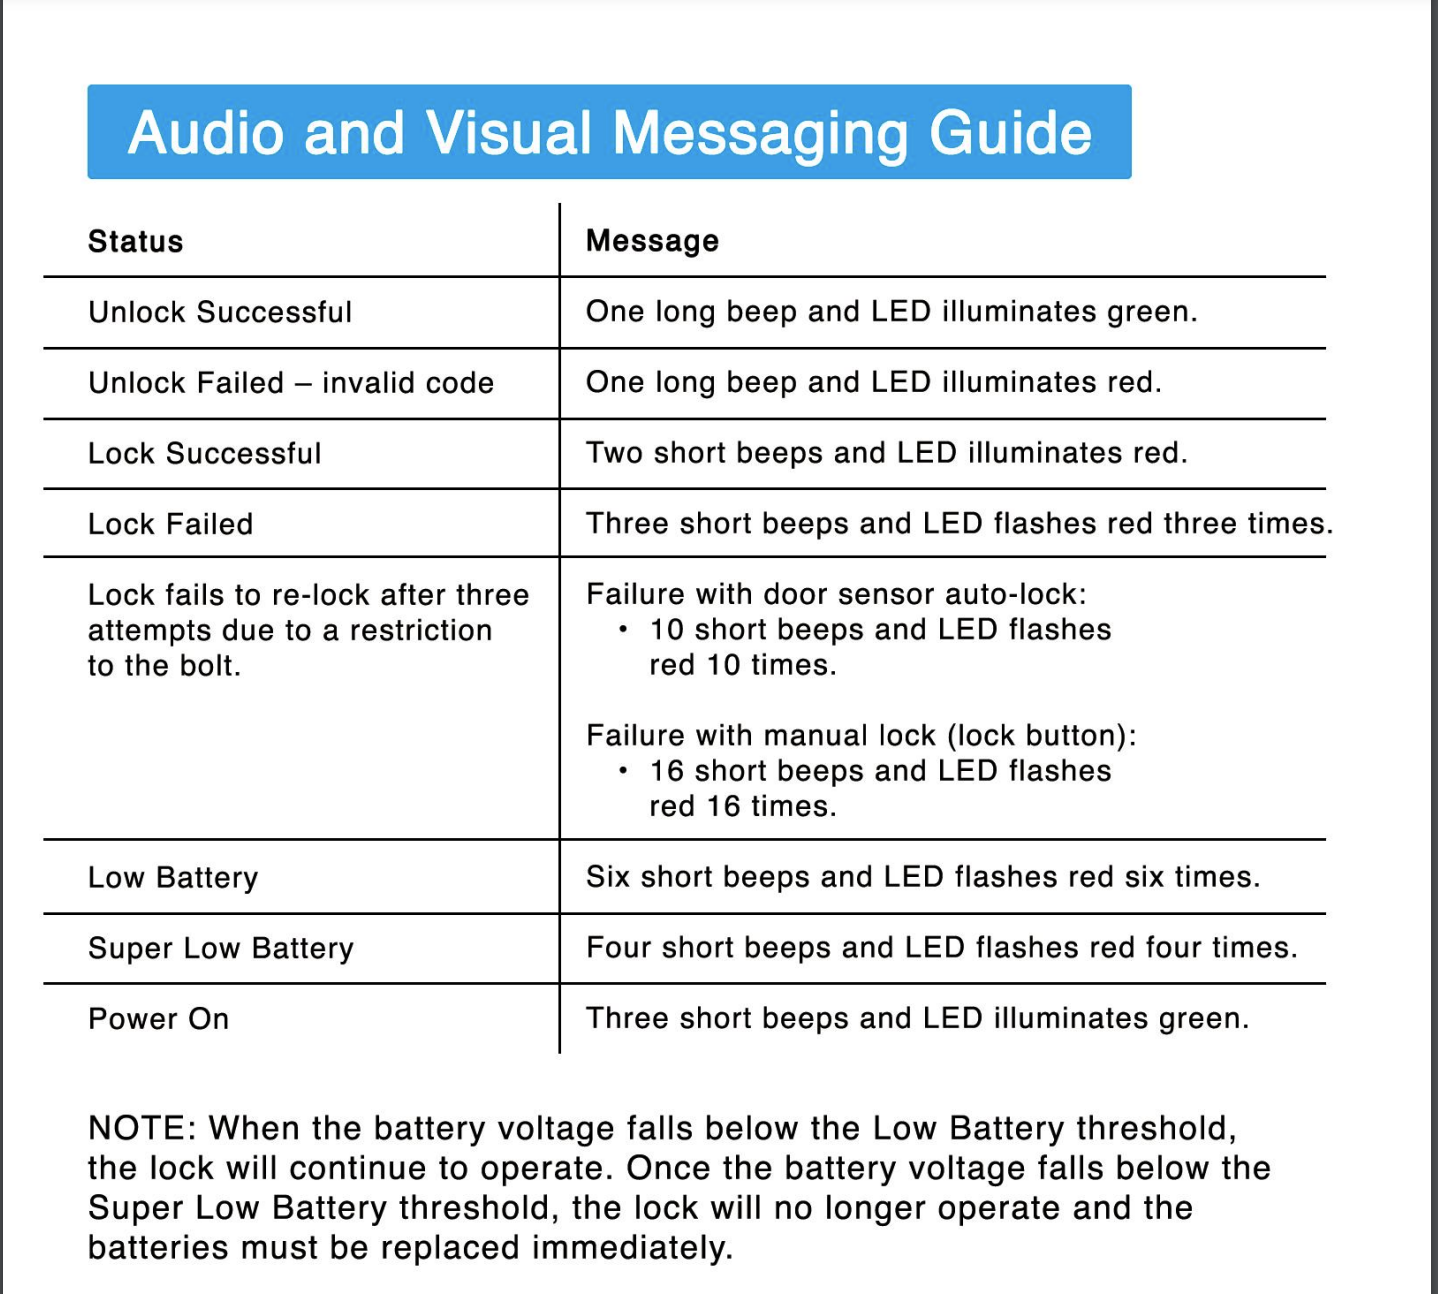
Please view the messaging guide below to help you pinpoint any issues.
If you have questions about which MojoLock version you have, you can call our office. The G3's battery compartment is harder to remove. The G4's battery compartment will EASILY slide off.
MojoLock G3 Messaging Guide (If you have a G3, the battery compartment will be harder to remove)
MojoLock G4 Messaging Guide (If you have a G4, the battery compartment will EASILY slide off)
Lock Will Not Lock
Try opening the door to make sure the lock will lock without the door closed. If it locks fine, then when you close the door try to pull or push the door against the door jam to see if it's locked. The issue is typically the door is a little out of alignment and the deadbolt "hole" is not lined up. Also, check the batteries. (Video below)
Lock Will Not Unlock
Try to manually move the door in or out so the deadbolt and the deadbolt hole are lined up better. Usually, the deadbolt is a little out of alignment and pushing or pulling the door a little bit will help it line up. Also, check the batteries. (Video Below)
Lock Feels Like It Has A Spring (Tension) Pushing the Bolt Out
This happens when the lock has tried to lock and it couldn't fully lock. To remove the "spring tension", you have a few options: 1. Unlock with a code or bluetooth (note manually unlocking with a key or the inside turn dial will not remove the spring tension. 2. You can push the lock button on the outside and when it fully locks, the spring tension will go away. (Video Below)
MojoLock Troubleshooting Video
How to Change Batteries On the MojoLock
Make sure you install Energizer Max AA batteries.
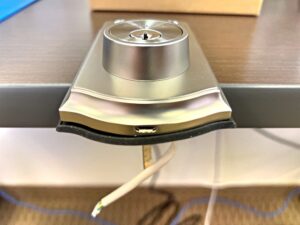
If you are locked out, you can use a battery pack with a micro USB cable. Insert it into the bottom of the outside of the lock and it will power it enough to lock or unlock the deadbolt.

